
Submit an event
Submitting an Event
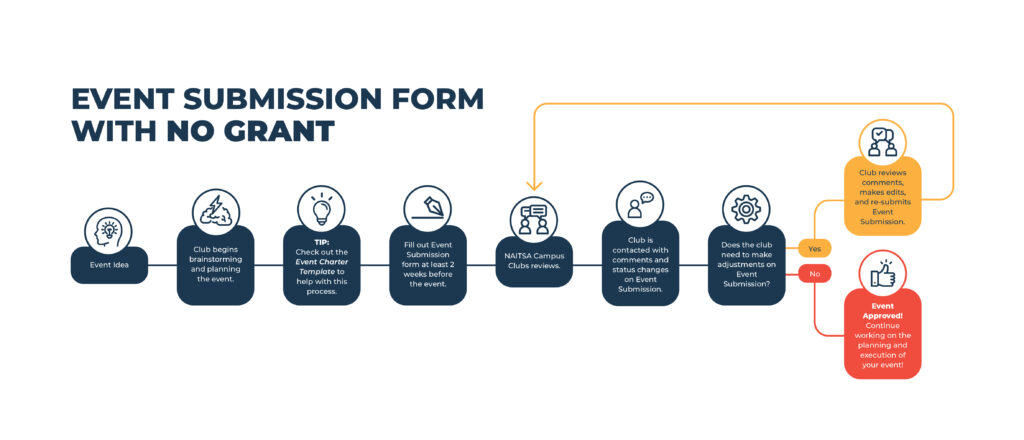
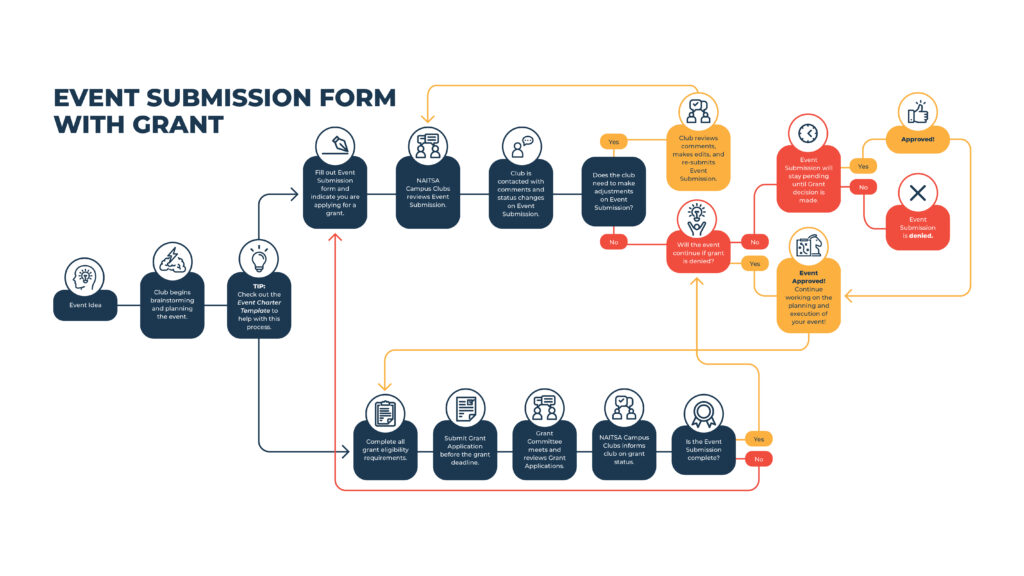
Before hosting any club event—on or off campus—you must submit it for review and approval through the Event Submission form on your club’s page on ookslife.ca. This process helps protect your club, promote your event, and unlock important support services.
Get Started: It’s Okay If It’s Not Perfect
Your Event Submission doesn’t need to be finalized. If you’re still waiting on details, but need services like space bookings, ticket sales, merchandise sales, or advertising, go ahead and submit a work-in-progress version. Submitting early allows NAITSA Campus Clubs to begin supporting your event while you finalize the rest.
Why Submitting Your Event Matters
Submitting your event on ookslife.ca ensures you get access to resources and support you won’t get otherwise. Here’s what your submission unlocks:
- NAITSA Campus Clubs’ liability insurance coverage.
- Official club credit for hosting your event (each club must host at least one event per semester to remain active).
- Free promotion on ookslife.ca.
- Waivers built into the RSVP—no paperwork needed.
- Guidance from NAITSA Campus Clubs to help elevate your event.
Plus, it allows you to request valuable services, including:
- Space or equipment bookings.
- SQUARE payment training.
- NAITSA e-commerce set-up.
- Event ticketing.
- Poster design approvals.
- Paid Nugget or SATV advertising
IMPORTANT: The more services you request, the longer the review process may take. Plan ahead and submit early!
How to submit an event
How to Submit an Event
Whether you’re planning a one-time social, a recurring club meeting, or a multi-day fundraiser, all club events must be submitted through the Event Submission form on ookslife.ca and approved by NAITSA Campus Clubs.
Follow these steps to start your Event Submission:
- Go to ookslife.ca and log in using your NAIT credentials.
- Open the left-hand navigation menu.
- Under My Organizations, find your club and select the gear icon next to it.
- Click Events.
- Click Create Event.
- Fill out the Event Submission form and press Submit when done.
Prefer to watch instead? Watch our quick Event Submission tutorial video for a step-by-step walkthrough HERE
How to Submit an Recurring Event
Recurring events include weekly, monthly, or bi-weekly meetings or activities with the same core details but on different days and times.
Important Notes:
- All occurrences must have the same event title, description, and details (e.g., food/no food, movies/no movies, same host structure).
- Only the time, date, and location can vary for each instance.
- Once your Event Submission is approved, each event becomes an individual event. After approval, any changes (e.g., location updates or cancellations) must be made individually for each event.
To enter a recurring event:
- In the Event Submission form, scroll to the Time and Place section.
- Fill in the Start Date, Start Time, End Date, End Time, and Location for your first occurrence.
- Click Add Another Date.
- The system will duplicate the previous entry. Update the date, time, and location for each recurrence.
- Repeat until all occurrences are added.
- Double check each entry—sometimes the system adjusts times or dates unexpectedly.
If you reach the maximum number of recurring dates, you’ll need to submit a second Event Submission for the remaining dates.
How to Submit Multi-Day Events
Multi-day events are single events that run across two or more days (e.g., a two-day conference or a three-day tournament).
There are two ways to submit a multi-day event, depending on the format:
1. No Specific Daily Start/End Times (e.g., ongoing donation drive)
- Enter the Start Date as the first day and the End Date as the final day.
- Set the Start Time for Day 1 and the End Time for the last day.
- Leave out additional dates.
- Example: Bottle drive running May 1–5 with no specific timing.
2. Specific Start/End Times Each Day (e.g., 10 a.m.–2 p.m. daily)
- Enter the first day’s full Start Date, Start Time, End Date, End Time, and Location.
- Click Add Another Date.
- Update the next day’s timing and location, and continue for each additional day.
Like recurring events, once approved, each date becomes a standalone event and must be edited individually if changes are needed.
TIP:
Join the NAITSA Campus Club ookslife.ca page to have access to all our forms and documents. Some are mandatory when requesting services

Review or Resume a Submission
Need to finish a draft or respond to feedback? Here’s how to find your submissions:
- Go to ookslife.ca and log in.
- Click your initial or photo in the top-right corner.
- Select My Submissions.
- Click the Events tab.
- Use these filters to manage your submissions:
-
- Started: Click Resume to keep working on a draft.
- Denied: Click the submission to view feedback, scroll down for comments, and click Resubmit to make changes.
- Unapproved: View pending events and scroll to see comments. You can reply with additional information directly in the comments section.
-
Modify an Approved Event
Need to update an event that’s already been approved? Follow these steps:
- Log in at ookslife.ca.
- Use the search bar or navigate to the Events section from the left menu.
- Find your event and click Manage Event in the top-right corner.
- Select Change Details.
- Edit your submission as needed.
- On the final screen, leave a comment summarizing all the changes you made, then press Submit.
- NAITSA Campus Clubs will review the update, add comments if needed, or approve the revised submission.
If changes are requested, refer to the Review or Resume a Submission section above for steps on how to respond and resubmit.
View RSVPs & Responses
Need to see who RSVP’d to your event—or check how they responded to your RSVP questions (like food preferences, waiver acknowledgment, or volunteer sign-ups)? You can easily view and download this information through your event page on ookslife.ca.
Follow these steps:
- Go to ookslife.ca and log in to your account.
- Use the search bar at the top of the screen to find your event, or navigate through your club’s Events section.
- Click Manage Event in the top-right corner of the event page.
- Select Invitations & RSVPs.
- Scroll through the list to view RSVP responses in your browser. This list shows who RSVP’d and any response details.
- To download a full report, click Export on the right-hand side.
- When prompted, click View on the pop-up window, or navigate to your icon in the top right and select My Downloads from the drop down menu.
- Then click Download Report and open the file from your downloads folder.
The report includes:
- Names and emails of RSVP respondents
- Answers to any RSVP questions you added during your Event Submission (e.g., dietary needs, T-shirt sizes, waiver confirmation)
- Timestamps of when individuals submitted their RSVP
This tool is especially helpful for planning seating, food, check-ins, or any custom needs for your attendees!
Collect & View Post-Event Feedback
Getting feedback after your event is a great way to understand what went well and what could be improved. You can easily collect this feedback using the Post Event Feedback feature in the Event Submission form.
How to Set Up Post Event Feedback
- In your Event Submission form, navigate to the Post Event Feedback section.
- Check the box that says “Automatically send Post Event Feedback notification after event.”
- Add any custom questions you’d like attendees to answer. These can be open-ended or multiple choice—whatever fits your event!
- Complete and submit the rest of your event as usual.
How It Works for Attendees
- Feedback requests are sent automatically to individuals who were checked in using the Event Check-In App.
- Each attendee receives a unique feedback link by email, which is valid for 72 hours.
- Responses are anonymous, so attendees can share honest feedback.
How to View Feedback Results
After your event:
- Go to ookslife.ca and log in.
- Navigate to your event page.
- Click Manage Event.
- Scroll to the Post Event Feedback section.
- You’ll see a summary rating out of 5 stars, including how many respondents selected each rating.
- To view more detail, click Export Feedback.
- When prompted, click View, or go to your My Downloads page to retrieve the file.
The feedback report will include:
- The overall star rating
- Responses to your custom feedback questions
- Number of participants who submitted feedback
Use this information to guide your future planning, strengthen your events, and show your club’s impact!


